Today’s blog comes from Alana Kelly, one of our archaeological volunteers on site, who more-often-than-not was given the job of mapping in the features we found. Today she tells us all about how our archaeological maps were drawn and why they’re important!
An important part of any archaeological excavation is recording and mapping. While most people may think of large excavation units and masses of artefacts when they think of archaeology, the mapping and recording of each tiny detail is a very large portion of what we as archaeologists do. The Milton and Lawrence excavations conducted by the Southern Cemeteries Archaeology Project are no exception, and you may have noticed the detailed maps of the excavations on previous blog entries. So how do we make site maps?
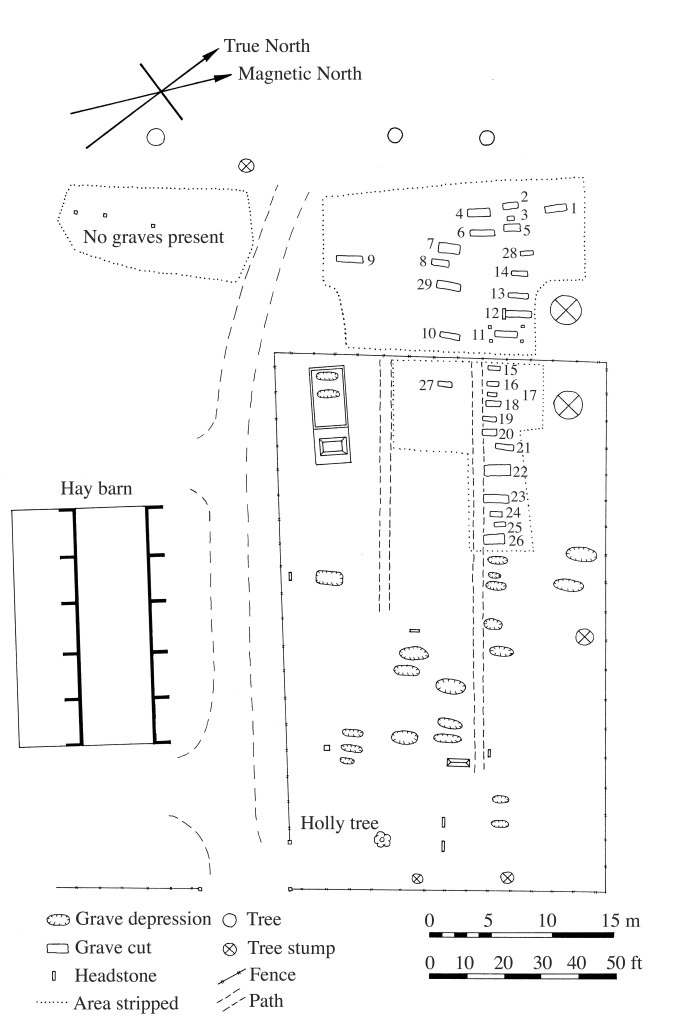
When it comes to mapping there are many different methods archaeologists use ranging from simple compass and tape maps, through to more high-tech GPS techniques. The method we use depends on several factors including the archaeological site type, environment, and available resources. At both the Milton and Lawrence excavations we used a plane table and telescopic alidade, which is a fast, accurate, and straightforward surveying method. An alidade is a sighting device that allows the user to measure the distance to a selected point, as long as there is a direct line of sight, and the plane table is on a tripod and provides a level drawing surface to make your map. This method was suited to the Milton and Lawrence excavation sites as they were open and visible areas. The other main advantage of using this method is that mistakes become obvious very quickly as you are drawing the map as you go, so they can be fixed while still in the field.
We set up the plane table and alidade somewhere central so that all of the features we wish to map are visible. Once that is decided the tripod and plane table gets set up and levelled to ensure there is no in-built error. Then a piece of graph paper/permatrace is taped to the table with the alidade placed on top and once an appropriate scale is decided you are good to go!
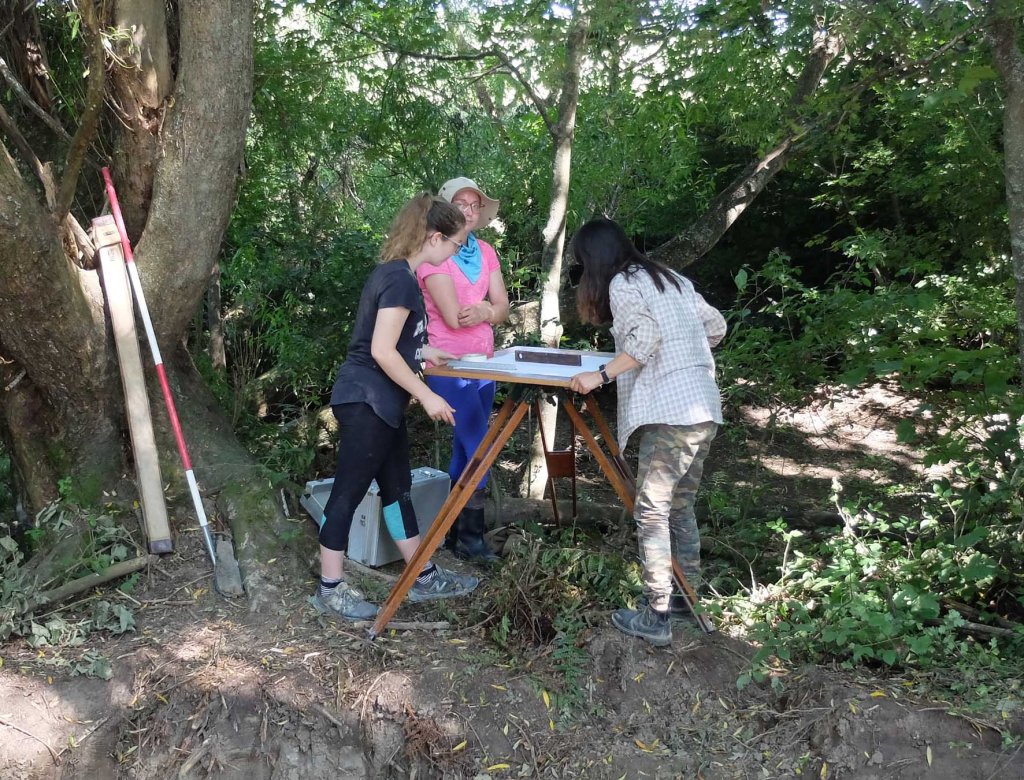
With all the gear set up you have one person at the tripod and another with a stadial rod (also known as the idiot stick) which is a graduated rod from which the measurements are taken. The stadia rod is held at the point or feature of interest and by looking at it through the alidade and counting between the crosshairs a measurement is taken and drawn on the map. This process is then repeated on all points needed.
As you may have noticed we map in a lot of features including grave cuts, depressions, fence lines, headstones, and so on. However, an important feature that is easy to overlook is the vegetation at the site. For example, historic trees, hawthorn hedges, and holly bushes were identified at the Milton and Lawrence sites, and while they can easily blend into the background, they actually tell us a lot about what these historical cemeteries once looked like.
For example, at the ‘new’ Lawrence Cemetery, historical trees and hedges indicated the original extent or boundary of the site, and this can help us identify what areas need further investigation. When they’re put together the features we survey and maps we produce are just one of many ways that we learn about and recreate these historical sites.
Alana Kelly
